home about contact favorite featured blogs

Tuesday, October 28, 2014

Simple Quiet Book


I have been waiting and waiting to put this on the blog! I actually started these before Weston was born, but I wanted to give one to my friend having a baby and I wanted to keep them a surprise! These are the easiest quiet books you will ever do, and you hardly need any supplies. 

You need:
-One white felt rectangle for every page you want to do. You can get pre-cut squares at Hobby Lobby or other craft stores. If you are looking to save money, you can get a yard or two of white felt and cut your own rectangles. The great part about that is that you can make them as big or as small as you want. 
-Fabric for the actual colorful pages. I chose to do mine all flannel animal print. When I started this book, I bought 12 different patterns and I bought 1/4 of a yard each. Out of the 1/4 yard, I was able to make enough pages for 4 different books! I only bought it if it was on sale, so each book was such a great price. 
-Fabric puncher in order to make the holes for the "binding", or you could just cut little slits with scissors.
-Brads to keep the holes in the binding from becoming bigger. 
-Three key rings to keep it all together. 


Weston is crazy about this book! He loves animals, so it keeps him occupied for a long time. 


It's so fun to find all sorts of cute fabric to do this with! You could do it with just different colors, or fabrics with kids on them, things from around the house, camping... The ideas are endless! 


Once I got all my fabrics together, I zig-zag stitched around the edges for each page. You could iron the sides under and straight stitch around them, but I thought that seemed like more work. This was really fast and easy! 
After all the fabric was sewn onto the felt, I straight stitch two pages wrong side together in order to make it into a book. 


You add the brads and key rings and boom! Easiest (and cutest) quiet book done!


Like I said before, I was able to get 4 quiet books out of the material that I bought. I just finished them all ahead of time so that when a baby is born, I already have a hand-made present for them. 


I gave this book to Weston for his first Christmas last year. I can't believe he's already one year old! Life goes so fast with a little guy around. 


Photobucket

Thursday, September 4, 2014

I Love My Dream Board!

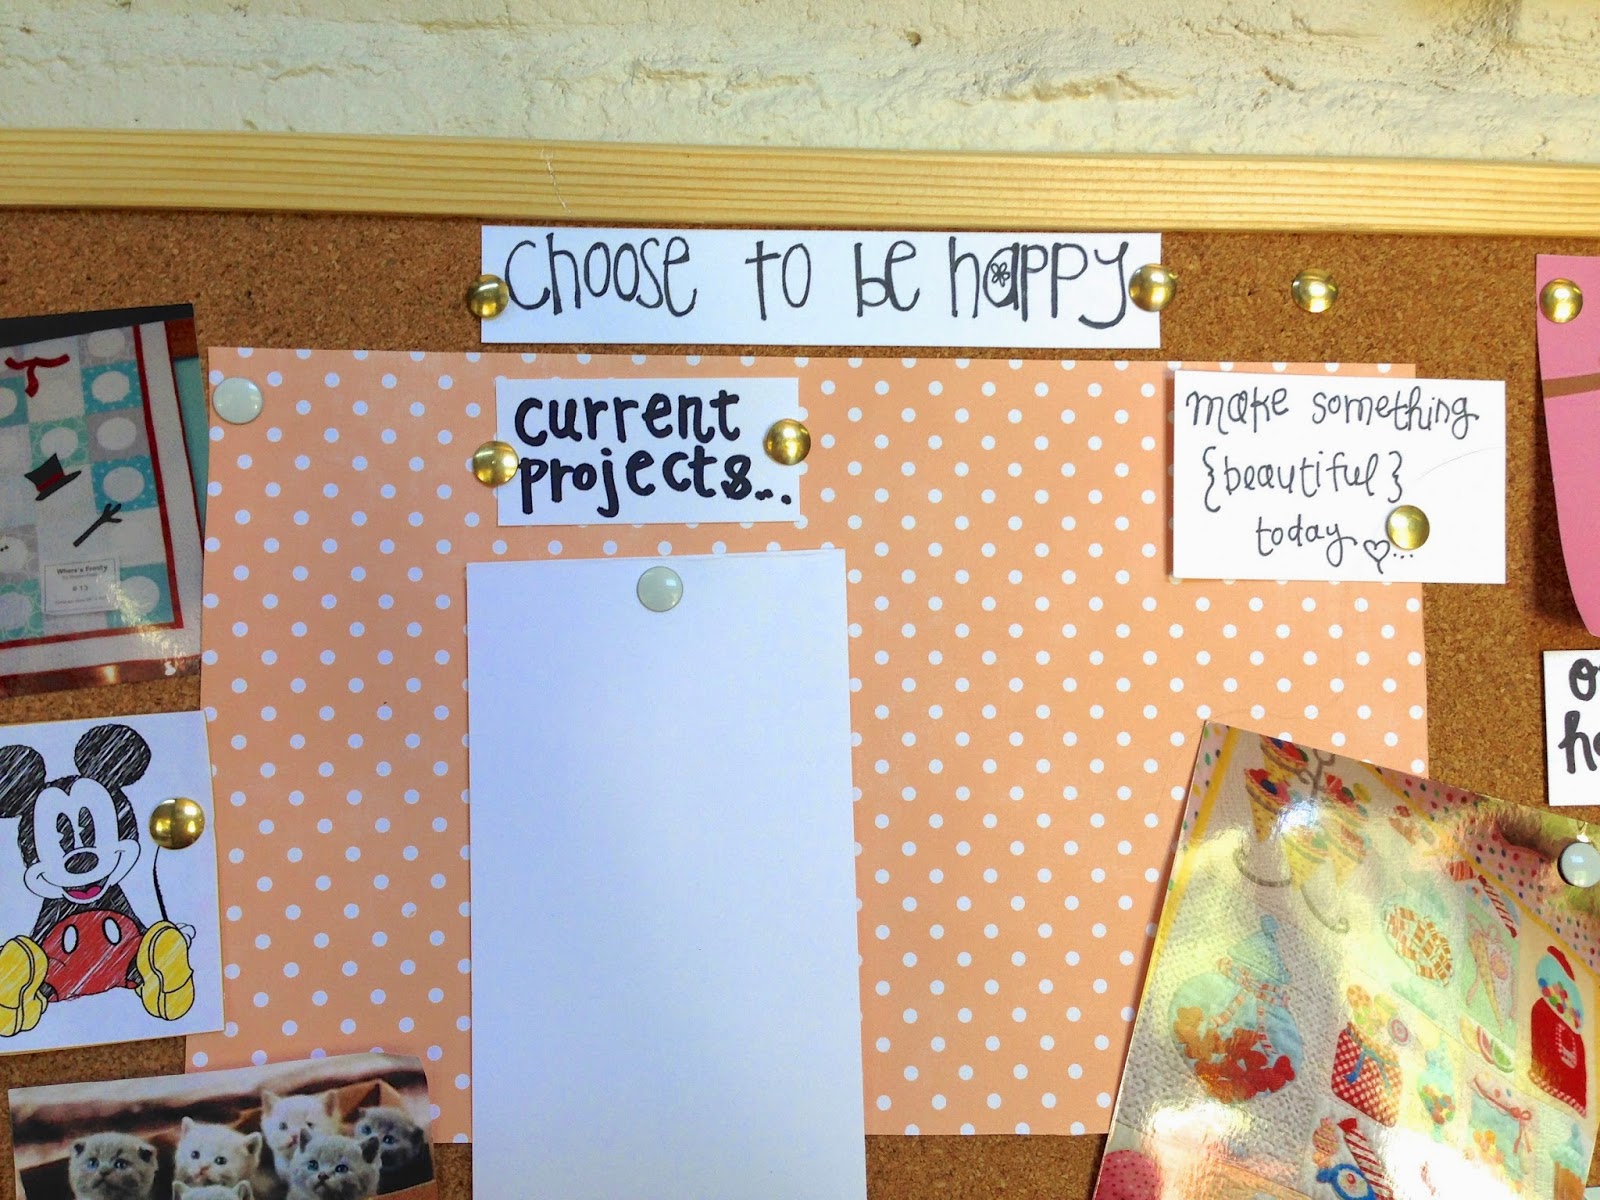
I'm a dreamer, always have been and always will be. But I'm also a planner. So this was the perfect craft for me... I'm just calling it a dream board because honestly, a dream organizer board just sounds lame! :) I had a cork board laying around not being used, so I figured I might as well utilize it.  You could also use a poster board or even just construction paper. The great thing about making a dream board is that it can have anything you want on it!


I started out by looking on all my Pinterest boards to see what were some of my favorite pins. You could also look through magazines and cut pictures out from there. I snagged a picture of my two boys, because let's be honest, they are my favorite. I left some blank spaces for goals and project lists... My husband thinks that I have a list obsession. I may or may not agree with that. :) I also have some pictures from my phone of projects that I want to create.


At the very top of the board, there is one of our new goals... Choose to be happy! We decided recently that we need to be more aware of the people and things around us. Suddenly, when you have a baby, there's a whole new perspective on life! We made a goal to only be around people that are uplifting and make us feel good. These boards are great because they can give you a daily reminder of what you are working on and why. It was so much fun to make!

What's on your dream board?


Picture credit from Pinterest
"the earth has music"
painting of bird
mickey drawing
crazy cat lady
map idea
get out of town
eiffel tower
you're my lobster
you aren't a tree
love is spoken here
temple
country scene
life is better
owls


Photobucket

Wednesday, August 20, 2014

Hedge Hogs make the cutest pattern!

I have seen a few square baby vintage blankets floating around and they always look so cute! I have had some cute fabric laying around waiting for me to do something extra cute with it. Have you seen the Moda fabric "Blue Bird Park"? I just love it! I have had it for a few months now, but I've been waiting to do something extra special with it. Vintage style baby blanket it was. :)

 I had a 5x5 inch charm pack, and I cut each square into 4 squares. Then I just laid them out on the white flannel. I pinned them, which ended up being the HARDEST way to do it. (That is usually my style.) After, I found out that most people use fabric glue to get the squares to stay. My lines would have been more even if I did that, but I wasn't too worried about it.

Seriously... those hedge hogs.. I love them!

I had the front, padding, and back already together. So when I sewed the squares on, it was also doing my quilting for me. It was the fastest way to do a blanket!


This little owl I just cut out and appliquéd right on. He was really easy to make!
I used a blanket stitch around some of his edges, but some of them (like the beak and feet) I left a raw edge for texture. 


The binding is my absolute favorite part! Can you guess why?? Ha ha. On the front of the blanket, it's just coral, and on the back is the line of hedge hogs!

You can also see my quilting lines. You can see every mistake when you do it this way.. If it wasn't a baby blanket, I don't think that my OCD mind could take it. But luckily, it's supposed to just be cuddly. 


Everyone I know is having baby boys. So this quilt does not have a home yet. But I was just aching to use this pretty fabric! 


What have you been sewing lately? 

And just because I have the sweetest little buddy... Here is a picture. :) 


I added some more blogs to the Blogs I Love page! Check them out!


Photobucket

Wednesday, July 30, 2014

Color a Quilt!


This blog post is pretty much a day late and a dollar short, but my sewing friends have been dying to see this, so I thought I would post about it anyway. This is the giant quilt I made for my sister and new brother-in-law! I can't even tell you how much fun it was to make. 

The squares around the middle are pictures that were drawn about Torri and Taylor together. The squares towards the top of the quilt are pictures from Taylor's childhood, and the bottom ones are pictures from Torri's childhood. It was so fun to talk to my family and decide what are some of our favorite memories of Torri!

This is a tutorial on how to do the lettering found in the center. My Aunt Sue taught me and as you have read before, she's a genius! :)

I picked the saying, "Loves changes everything" because Torri has said that many times about Taylor. I printed off the saying just on printer paper, then I used a light box to pencil it onto my fabric. Make sure you know where your center is so that you can get your saying lined up the right way. 


Here's how it looked once it was all penciled on. 


On the back, I safety-pinned some batting so that the string would have something to hold onto. 


Next, I just hand stitched with black thread all the way around the letters, just following my pencil line. This part took me the longest, but I'm not super fast at it yet. Sue always machine stitches hers, but her machine has a slow setting so it makes it much easier. My machine has just one setting, and it made it pretty hard. So hand stitching it was! 

After you are done hand-stitching, you just need to grab a black sharpie and fill it in! It's really easy because the sharpie pretty much stays within your stitch lines. 


I asked my family what were some of their favorite memories of Torri. One thing that we all mentioned was when she dressed up as "Beth" from "Dawg the Bounty Hunter" for Halloween! And our endless beanie babies was another fun memory. 


Torri was in the room with us when we had Weston, so I traced his hands and put it on a square. Weston is her first nephew, so I thought it was fitting. I thought that this would also be a really cute gift for a grandparent. You could trace all their grandchildren's hands and have each of them draw a picture. 
Other things that make it more personal are taking actual pictures of them and making it into a quilt drawing. This was from the first time they vacationed together. I just made it a more simple version. 


If you want to do a quilt drawing, follow my instructions found in this post. One thing that I would pass on from what I learned with this quilt is to graph out your quilt before you start to do it. I usually only make smaller blankets, and with those I just wing it. Big quilts must be planned! Sue always uses graph paper to plan her quilts, and it works perfect. 

Here's a few pictures from the day because it was just so pretty!! 
(Photos by the amazing Haley Hodges)


The bow tie... kills me!! Weston was 7 months old. 


And just in case you are wondering... Steven was a rockin' minister! I kept telling Torri that her minister was so hot that I was going to have an affair with him.. hehe! :)


Happy quilting!
Photobucket

Tuesday, June 17, 2014

Oh, what do you do in the summer time when all the world is green?

This year, my family decided to do a stay-cation instead of a vacation. I really wanted to do something fun with my family, but my husband and I are both really low on fuel. Our little guy still gets up 2-3 times a night and hardly takes naps, plus my husband has to get up at 4:45 for work. So we are TIRED ha ha. My family was awesome and gave up their vacation to spend some time with us. We sat down and made a list of all the fun things you can do around Salt Lake. The list was long! We are always getting out of town to do all sorts of fun things, but there are so many fun things that we never do that are basically in our backyard! So.. if you live in the Salt Lake valley... here are some fun summer ideas for you!

Fishing
There are so many fun places to go fishing. You can get a day fishing license if you don't necessarily want to go all the time. Steven usually fishes up in Midway.


Aquarium
The big aquarium opened this summer and we went last weekend. For a land-locked, desert state it was pretty amazing! Their big river monsters were so cool, and the shark tank was awesome. You definitely won't be disappointed.


Timpanogas Caves/hiking
My family had never been to the Timp Caves before. They were amazing! I had no idea we had something like that right in our backyard. Our guide gave us all sorts of interesting historical facts about the caves and the people that discovered it. We have also hiked Mount Timp before which was a lot of fun, but a lot of work. So if you go do that, be prepared with lots of water!


Crater swimming
We did this last Saturday and it was so much fun! It's also at the Homestead Resort. It is natural mineral waters that are literally in a giant crater. The water is about 95 degree and it was so nice to swim in. The warm water put the baby right to sleep. You can also get dive certified there.


Horseback riding
This was one of the things that we didn't have time to do. You can do it in Midway, but at the Homestead Resort. It's definitely something we want to do this summer!

Hogle Zoo
Have you been to the zoo lately? They have redone almost everything. It is so nice and so much fun! The bird show is incredible. Our favorite part is being able to watch the seals swim. They are so cute!


Fast Karts
We haven't done this one yet, but it's on our summer list.

Park Silly
Every Sunday, Park City Main Street has a farmers market. It is so fun! We went last Sunday with my family and we loved it. They have all sorts of foods and arts. People are so creative! You can find a lot of fun things there.


Color Me Mine
We have been here a couple of times and I want to go back with my sisters. I decided that I want to paint myself a tea set. It is so much fun! Tuesday night is their two-for-one deal, so if you have a bigger family, I would definitely try to do it that night. If you get on their Facebook, it will show you a whole bunch of different deals.


Family game night
No money needed for this one! Grab some dinner and hang out with some good ol' board games. Have you ever tried Balderdash? I love that game. Phase 10 is another classic.

Swimming
You can do this at a lot of different places obviously. A friend's pool, a rec center, Seven Peaks. Summer is the time to swim!

City Creek
I LOVE City Creek! It's such a fun place to shop and eat. Even if you don't want to shop, it's fun to walk around and watch the fountains.

Snow cones
We love to get snow cones! Our favorite place is called Hokulia. They have a bunch of locations, but we go to the one on Fort Union. They have snow cones as big as your face!


Get outside and PLAY this summer! Do you have fun ideas? Comment below to share! 


Photobucket